HydraForce Insider Blog

Right-Size Your Hoses and Pipes To Reduce Pressure Drop in Manifolds

Posted by David Price on Wed, Oct 19, 2011 @ 11:10 AM

When designing a hydraulic system, you want to optimize your design for minimal pressure drop. Savvy system designers have found that using a custom manifold with the right combination of cartridge valves is one way to optimize a system. When using this approach, it is important to correctly size your valves, drillings, and flow paths within the manifold. It is just as important to “right-size” the hydraulic hose and pipe connecting the manifold to the rest of the installation. Hose and tubing need to be the right diameter, length, smoothness and shape to handle the demands of the pressurized hydraulic flow. Undersized hose or tube can cause turbulent flow and excessive heat buildup. Over-sized hose or tube can add cost, size and weight to a system and decrease the rate of flow.

To understand what “right-sizing” means in terms of hydraulic hose and tube, you must first understand the nature of fluid and friction. Whenever fluid flows, there is a loss of mechanical energy to overcome viscous forces within the fluid. In a hydraulic system, this loss is seen as a pressure drop in the direction of flow.

Each component within the hydraulic system will contribute toward the pressure drop, i.e. cartridge valves, tubing, fittings, hoses, filters etc. This lost energy is dissipated as heat energy in the oil.

Frictional losses in pipework are mainly dependent upon:

  • Length of pipe

  • Cross-sectional area of pipe

  • Roughness of pipe surface

  • Number of pipe bends

  • Velocity of flow

  • Viscosity of fluid

The total allowable pressure drop of the hydraulic system must be chosen with care, as the power loss is a product of the system flow rate and pressure drop. This is an efficiency loss that has to be balanced against the cost of larger pipework/hoses and fittings. The wasted energy is dissipated as heat energy in oil, which may lead to cooling problems and shortening of the oil life.

Pressure losses in pipework will depend upon the flow condition. There are two distinct flow conditions: 

  1. Laminar Flow and

  2. Turbulent Flow.

Laminar flow is the condition when the fluid particles travel smoothly in straight lines, the inner-most fluid layer travels at the highest speed and the outer-most layer at the pipe surface doesn’t move, as shown in Figure 1.


Figure 1 – Laminar Flow

Turbulent flow has irregular and chaotic fluid particle motions, such that a thorough mixing of the fluid take place, as shown in Figure 2. Turbulent flow is usually not desirable, as the flow resistance increases and thus the hydraulic losses increase.


Figure 2 – Turbulent Flow

The Right Calculations

To determine the right size of hydraulic piping, you must first do the right calculations for the nature of the hydraulic flow in your system.

Osborne Reynolds discovered that the flow condition depended upon the mean flow velocity, the diameter of the pipe and the kinematic viscosity of the fluid, formula 1.

Re =

4 Q


Π ν d


Formula 1


Q = Flow (m3/s)

d = Pipe internal diameter (m)

ν = Kinematic Viscosity (m2/s)

A Reynolds number of 2000 or under is deemed to be laminar flow. A Reynolds number above 3000 indicates turbulent flow.

Pressure loss in straight pipe can be calculated using Poiseuille’s equation (for laminar flow only). See Formula 2.

ΔP =

128 μ L Q


Π d4


Formula 2


A more general equation used for turbulent flow and laminar flow is D’Arcy equation. See Formula 3.

ΔP =

4f

L


ρ U2


d


2


Formula 3


ΔP = Pressure Loss (Nm-2)

F = Pipe Friction Factor

L = Pipe Length (m)

D = Pipe internal diameter (m)

ρ = fluid density (kg m -3)

U = Fluid mean velocity (ms-1)

The friction factor (f) depends upon the nature of the flow in the pipe. The most convenient form of depicting friction factors are from a Moody Diagram. However for hydraulic systems it is often assumed the pipe conditions are smooth.

A quick and easy and more common method of determining pipe/hose sizing, is to calculate the diameter size based upon recommend fluid velocities. See Table 1.


Line Type


Recommend Mean Velocity m/s

Suction & Case Drain Lines

0.5 to 1.5

Return Lines

2 to 4

Pressure Lines

3 to 5

 Table 1 – Recommend Mean Fluid Velocities

 Based upon using the mean fluid velocities, the appropriate hose/pipe diameter is determined using Formula 4.

 V=

Q x 21.22


d2


Formula 4


Rearrange the formula to get:

d=

Q x 21.22


V


Formula 5


d = Diameter (mm)

Q = Flow (lpm)

V = Fluid Velocity (m/s)

This quick check calculation is useful to ensure that potential pressure drop and energy loss due to hose/pipework is not excessive when designing your manifold installation. For critical long runs of pipe or hose, the pressure losses should be checked using Poiseuille’s or D’Arcy equations as briefly discussed earlier.

Don’t let the wrong size of hydraulic hose or pipe keep your hydraulic system from reaching its maximum efficiency. Do the right calculations, and specify the right size of hydraulic hose and tubing to keep your installation at optimum working pressure.

Click me

Read More

Tags: cartridge valves, hydraulic circuit, hydraulic integrated circuit, manifold design, hydraulic cartridge valves, proper installation of cartridge valves, efficient manifold design

Making a Case for Hydraulic Manifolds: No More Spaghetti Please

Posted by David Price on Tue, May 03, 2011 @ 10:05 AM

What if I told you I could design a hydraulic system that functions the same or better than your current system, but with less cost, less space requirement, fewer leak points, better appearance and less assembly and installation time? First of all, would you even believe me? Secondly, why aren’t you doing it already?


   Well, everything I said is true. How we achieve a hydraulic system with less cost, less space requirement, fewer leak points, better appearance and less assembly and installation time, is to put it all into a big chunk of aluminum.

   In the industry, we call a big chunk of aluminum with hydraulic valves in it a “manifold.” HydraForce will sometimes call it a “combination valve.” Whatever you call it, the idea is simple. We take all of the hoses and plumbing that would normally connect separate valve components in a complete system, and we turn those into drillings in that big chunk of aluminum.

   Let’s talk about why it cost less. If you take ten different hydraulic valves to create a system, you may need thirty hoses and at least as many fittings to connect them all. On top of hose and fittings cost savings, the valves that go in a manifold cost less than separate and independent valves. Each of those individual valves requires its own “block” or “body” anyway. Why have ten of those when you can have one?

   I think it’s easy to see how removing dozens of hoses and fittings and consolidating ten valves into one can save you space. This may not be as much as an issue with industrial applications (depending on the machine), but with a mobile machine, every inch of space is valuable real estate.

  So now that we have fewer hoses, fewer connections and fewer components, we can see how we have reduced the number of points in which you can spring a hydraulic leak. Fewer leaks mean less money dripping away, and a reduced impact of the environment. There are very few hydraulic fluids that are environmentally safe, and the ones that are, are expensive enough to hold on to like a winning lottery ticket.

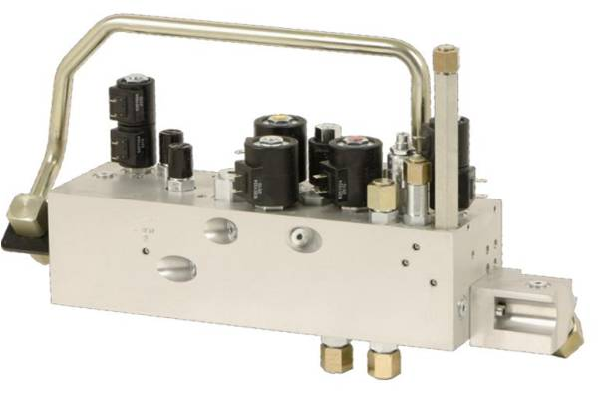
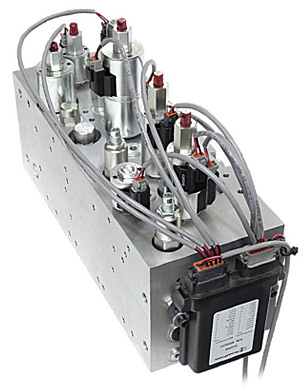
  Another benefit of a manifold design is the attractive appearance. It’s compact and shiny, and can be anodized any colour you wish. They leave you wondering what’s inside, and are great for keeping competitors from seeing how your system is plumbed together. Have a look at the photo on the right; does your hydraulic system look that good?

  Finally, you can’t beat the assembly and installation time of a manifold. Instead of spending hours plumbing separate components together, finding space to mount everything and crimping hoses until the wee hours of the night, you just mount the manifold and hook up your pressure, tank and work lines. Easy peasy, lemon squeezy!

  Manifolds have infinite applications. There are 200 gallon per minute hydraulic presses which use slip in cartridge valves in a manifold, and there are simple one valve custom blocks. One of my customers had just one pressure reducing valve in a custom manifold with a gauge port, and six work ports. This valve didn’t save them any money on the valve itself, but saved them a ton of time during installation and saved hose/fitting costs because it replaced a mess of tees, junctions and connections.

   Another advantage of a cartridge valve and manifold system is that the entire hydraulic circuit can be created and quoted using iDesign software, which is free to anyone who wants it. A system can be created, including positioning of the valves on the block in their 3D model interface. Distributors have access to the pricing function of the software, and we can quote a manifold you designed in seconds. The only real downside is the engineering and manufacturing time. You generally have to plan 6-8 weeks ahead to get a system in your hands.

   If anyone wants the free software, you can download it here, or shoot me an email and I’ll gladly bring a copy out and show you how to use it.

_______________________________________________________

Josh Cosford is a certified hydraulic specialist working in sales for The Fluid Power House (Cambridge) Inc. in Ontario Canada: http://fluidpowerhouse.com/

Contact him at joshc@fluidpowerhouse.com or call (519)-624-7109

He has also contributed articles as a guest writer to Hydraulics and Pneumatics.

Follow him on Twitter: http://twitter.com/#!/FluidPowerTips

Follow him on Faacebook:  http://www.facebook.com/#!/pages/Fluid-Power-Tips-by-Josh-Cosford/173198689366042


Read More

Tags: cartridge valves, benefits of cartridge valves, hydraulic integrated circuit, manifold design

Suggestions for Cost-Effective Hydraulic Manifold Design

Posted by David Price on Thu, Mar 10, 2011 @ 08:03 AM

Great things come in small packages. In the case of an integrated hydraulic circuit, the smaller, the better. Among the many benefits of a made-to-order block is the ability to achieve a smaller size through a more intelligent design. The 3D layout feature in i-Design will help you conceptualize your design in order to achieve a smaller hydraulic integrated circuit.

In this post I will attempt to clarify the common pricing modifiers that will affect the cost of a hydraulic manifold.

If you are not already familiar with HydraForce's manifold design software called i-Design, you can GO HERE to download a copy today , or contact your local HydraForce distributor to request a copy in disc. HydraForce continues to invest in and refine its i-Design software, and the best part of all: it's FREE!  In 2008, as part of our refinement efforts, HydraForce embarked on a comprehensive research project that included our manifold designers, purchasing department, and our manifold suppliers. The objective of this research was to further refine the scheme we use for pricing manifolds in i-Design by factoring-in the less tangible features of a manifold such as the number of cavities on a surface, the number of ports on a surface, and the mix of large and small cavities. We did this research to develop a better pricing model for our custom manifolds, but the results also offer valuable insight for those of you that design and manufacture their own manifold blocks. Each of the following features has an effect on the complexity and ultimately the cost of the manifold block itself. Unlike a copy of i-Design, spindle time and material are not free.  With the release of i-Design 2.0 in 2008, we included pricing rules for the following manifold modifiers:

• Extra port spacing.
• Cavity mix.
• Number of cavities.
• Number of cavities and/or ports on a surface.
• Ratio of large and small valves.

Extra port spacing for ease of installing fittings is self-explanatory, additional material is required. The cavity mix influences the price because a variety of 08 and 12 size cavities, for example, will require additional cross drills to connect the cavities. Depending on the arrangement, the number of valves or ports on a particular surface can also increase the complexity and the size of the manifold, therefore increasing the cost.
 
Some of these cost factors are not triggered until you lock components and ports to particular surfaces. If we receive an i-Design that includes a manifold layout, but the valves and ports are not locked to particular surfaces or locations, then we interpret the layout as simply a suggestion rather than a necessity. If a particular layout is desired, please use the locking feature in i-Design.
 
Another factor that influences the cost of a manifold is being required to conform to an existing mounting pattern. As you can see from the examples below, the additional material and machining will add cost to the manifold block.

Two manifolds
Two functionally equivalent manifolds
with different mounting hole arrangements.

Original Mounting pattern
Manifold design using the original mounting pattern.

Compact Manifold
More compact version of the manifold.

In conclusion, if you have a manifold design that has a specific mounting configuration that must be adhered to, be aware, it may increase the overall cost of the manifold. If HydraForce needs to conform to a mounting configuration, please use the locking feature in the 2D or 3D layout pages. Being flexible with your manifold requirements gives HydraForce and other manifold designers the freedom to provide you with an optimized, efficient, cost-effective design.

If you would like more information about i-Design,
please contact the i-Design Help Desk.

TO DOWNLOAD A FREE COPY OF i-DESIGN V.3, CLICK HERE


About the Author:

Craig Sinnott is a Regional Manager at HydraForce with more than 16 years of hydraulic experience. Contact Craig

Read More

Tags: cartridge valves, hydraulic manifold design, HydraForce, hydraulic integrated circuit, manifold design

Proper use of an Orifice in a Hydraulic Integrated Circuit

Posted by David Price on Wed, Mar 09, 2011 @ 12:03 PM

The proper performance of a hydraulic system is usually attributed to major components such as the motor, pump and valves. However, there is another unsung component that contributes equally to a system's overall performance: the orifice. In most traditional main hydraulic valves, orifices are built into the casting or dismounting components mold by the component’s constructors. In a cartridge valve manifold (otherwise known as a hydraulic integrated circuit), you start with a blank sheet of paper. Therefore, it is important to know where and when an orifice can change the performance of your system.

The orifice is one of the most versatile components that we can add in our hydraulic circuit. The orifice can be used to limit the amount of oil in one part of our system, to bleed a pressure line to tank, or to transform a nervous and aggressive circuit into an efficient and highly controlled one. Often times the orifice has to simultaneously manage a very small amount of oil, control a dynamic flow rate and dump a system’s compensator. In many applications -- especially for hydrostatic transmissions -- it is important to control the dynamic pressure of the system to avoid pressure spikes and pressure ripple.

Read More

Tags: Load Sensing, pressure control valve, proportional flow control valve, combine pressure control valve and flow regulator, hydraulic integrated circuit, Orifices

Subscribe by Email

Other related info

Sign up for Product news.

describe the image

describe the image

K  SALES TRAINING Image Library Custom Manifold Consultation resized 156

Follow Me

News Ticker

Click Here to see the latest HydraForce News.

Latest Posts

OTHER RELATED INFO

describe the image

describe the image

K  SALES TRAINING Image Library Custom Manifold Consultation resized 156